I've been busy finishing my Christmas cards.
I found this "JOY" stencil in my craft stash a few weeks ago and decided to design my card using it. I haven't stenciled anything in several years so I thought I would revive the craft this year. I forgot how much I like to stencil.
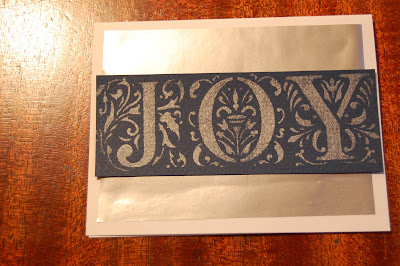
I put on Christmas music, hubby built a fire in the fireplace, and I stenciled at the dining table where I had plenty of room to spread out. As you can see, I stenciled silver paint on a piece of dark blue art paper (bought at Michael's for @ $2.00).
 After stenciling 2 whole sheets, I cut around the stenciled design to fit on the front of my card stock. I also cut down 8 1/2 x 11 sheets of card stock in half to make my card base.
I buy my card stock in reams to cut down on the cost. One ream lasts me several years. In addition, I cut down a roll of bulletin board paper (from the teacher store) to fit just inside the front of my cards (5 x 3 1/2 inches).
I also used glue sticks, dark blue ink pad, and two rubber stamps.


Then, I topped it with my stenciled "JOY".
Inside the card, I stamped a Bible verse and a graphic.

Then, I flipped the card over and stamped my "Handmade by" stamp and signed my name. Sometimes I add the date too. (ignore the aged hand in the picture!)

Well, that's how I make my simple Christmas cards. I usually make @70 cards every year. I like making something handmade for the people I love.
I found this "JOY" stencil in my craft stash a few weeks ago and decided to design my card using it. I haven't stenciled anything in several years so I thought I would revive the craft this year. I forgot how much I like to stencil.
I put on Christmas music, hubby built a fire in the fireplace, and I stenciled at the dining table where I had plenty of room to spread out. As you can see, I stenciled silver paint on a piece of dark blue art paper (bought at Michael's for @ $2.00).
 After stenciling 2 whole sheets, I cut around the stenciled design to fit on the front of my card stock. I also cut down 8 1/2 x 11 sheets of card stock in half to make my card base.
I buy my card stock in reams to cut down on the cost. One ream lasts me several years. In addition, I cut down a roll of bulletin board paper (from the teacher store) to fit just inside the front of my cards (5 x 3 1/2 inches).
I also used glue sticks, dark blue ink pad, and two rubber stamps.

First, I glued the silver bulletin board paper to the front of the folded card stock.

Then, I topped it with my stenciled "JOY".

Inside the card, I stamped a Bible verse and a graphic.

Then, I flipped the card over and stamped my "Handmade by" stamp and signed my name. Sometimes I add the date too. (ignore the aged hand in the picture!)

Well, that's how I make my simple Christmas cards. I usually make @70 cards every year. I like making something handmade for the people I love.
And I think I'm doing a great job just to get mine ordered by the beginning of December!
ReplyDeleteThose are gorgeous!! What a beautiful design. Well done.
ReplyDelete